Being a new product, the information on the Ubiquiti wiki and forums was slim so I decided to dig in and figure it out on my own. Along the way I found a few mistakes in the forums and now I want to share my information.
Here is the goal: Connect a Ubiquiti UVP phone to FreePBX gateway without the USG security gateway. I don’t hate the USG, I just don’t want or need one.
Option 1: Use what Ubiquiti terms the SIP standalone configuration. I will not cover that because it is handled pretty well here.
Option 2: Use the UniFi controller to quickly manage and provision the Ubiquiti UVP phones. This is the most elegant solution. Why?
- You continue using your existing PBX (provided you have one).
- You can manage phone updates, and provisioning quickly from the UniFi controller.
Sounds easy right? Well, it wasn’t for me as there are many holes in the documentation (in all fairness, they are working on this so I am not beating up Ubiquiti but of course I need to know how to do this NOW!) and the software was not very intuitive at least for me. I am sure it will improve quickly.
Let’s begin.
Background Work
- Install the version 4 controller on your favorite platform, for me that was Unbutu as a guest on Vsphere. Log in.
- Set up static DNS to point to the off site controller. This is called Layer 3 adoption and is covered elsewhere ad nauseam.
- Fire up the phone and adopt it. Again, there can be some issues and hiccups here, check the wiki, check the forums.
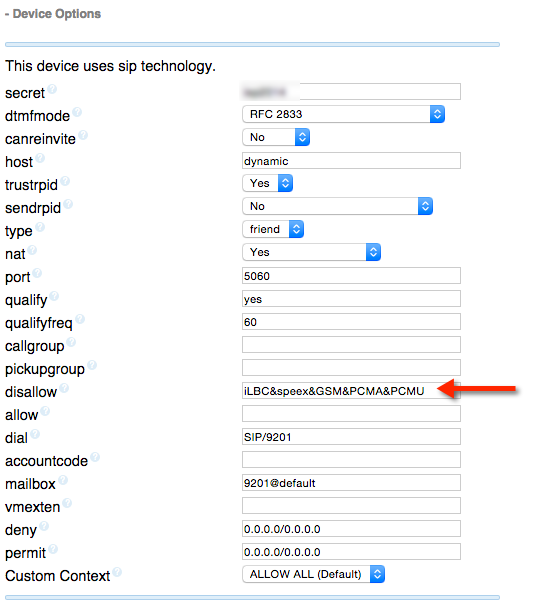
- Configure your FreePBX server by adding an extension. This is where one key piece of information was lacking, codec exclusion. The UVP tried to use codecs not supported by my PBX. The result was I could receive calls but not place calls. The call would begin and then I got error “Error #503 The server is undergoing maintenance…”. Dialing local extensions the error was “Call ended.” Doing a debug in asterix I saw the following:
v=0
o=- 3642429197 3642429197 IN IP4 199.21.228.155
s=pjmedia
b=AS:84
t=0 0
a=X-nat:0
m=audio 4060 RTP/AVP 9 0 8 104 99 97 98 3 96
c=IN IP4 199.21.228.155
b=TIAS:64000
a=rtcp:4061 IN IP4 192.168.89.253
a=sendrecv
a=rtpmap:9 G722/8000
a=rtpmap:0 PCMU/8000
a=rtpmap:8 PCMA/8000
a=rtpmap:104 iLBC/8000
a=fmtp:104 mode=30
a=rtpmap:99 speex/32000
a=rtpmap:97 speex/8000
a=rtpmap:98 speex/16000
a=rtpmap:3 GSM/8000
a=rtpmap:96 telephone-event/8000
a=fmtp:96 0-16
My guess was the UVP was trying to use codecs I did not have. The solution is to disallow those codecs in your extension config on that extension. SO, to create the extension, follow this guide HERE but add this step to the Device Options:
Now, they may have updated their guide by the time you read this because I submitted this as a revision to the wiki article. Yes, you are welcome! 🙂
The important line here is disallow “iLBC&speex&GSM&PCMA&PCMU”. Maybe you use those codecs and maybe they work for you but if they do, you probably aren’t reading this.
Save the extension and Apply.
Configuring the Controller
Again, not a lot of information to work with so I will try and fill in the holes. Open the controller in your web browser (again, covered elsewhere) and adopt the UVP. There are many people with issues adopting the UVP and that is covered well in the forums. My issue was firewall, I turned it off on the controller and the phone appeared immediately. After adoption, upgrade the phone if necessary, always a good practice.
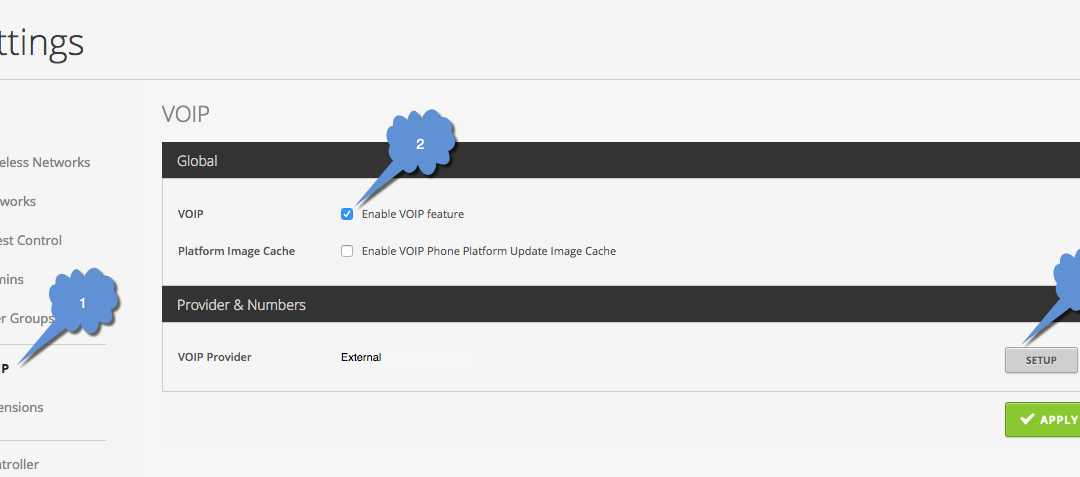
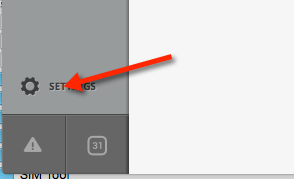
Then click the Settings button lower left.
1.-Click VOIP, 2-Enable it, Apply and then click 3-Setup:

Enter the IP of your PBX and make the other settings as shown by the red arrows, set as follows, and then Save: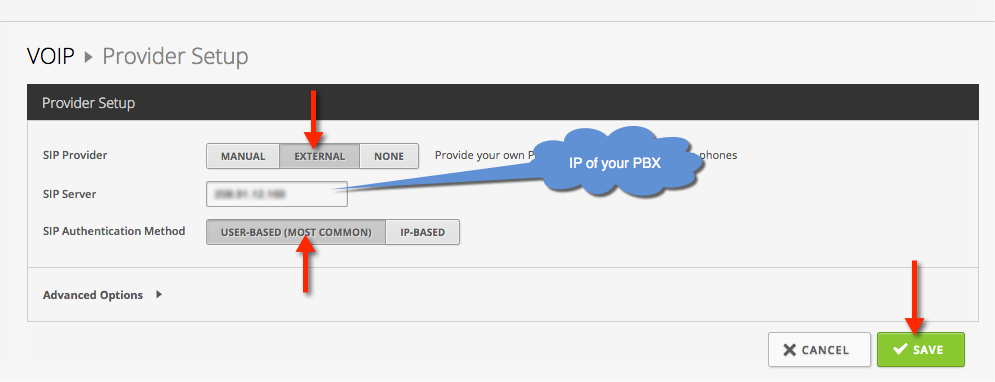
Then click 1-Extensions and fill in all the information marked by arrows. The extension number should match your FreePBX extension (but not mandatory), the name can be anything, select the phone you recently adopted to assign it to that extension, and fill in the use name (extension number you previously created in FreePBX) and password and click Save.
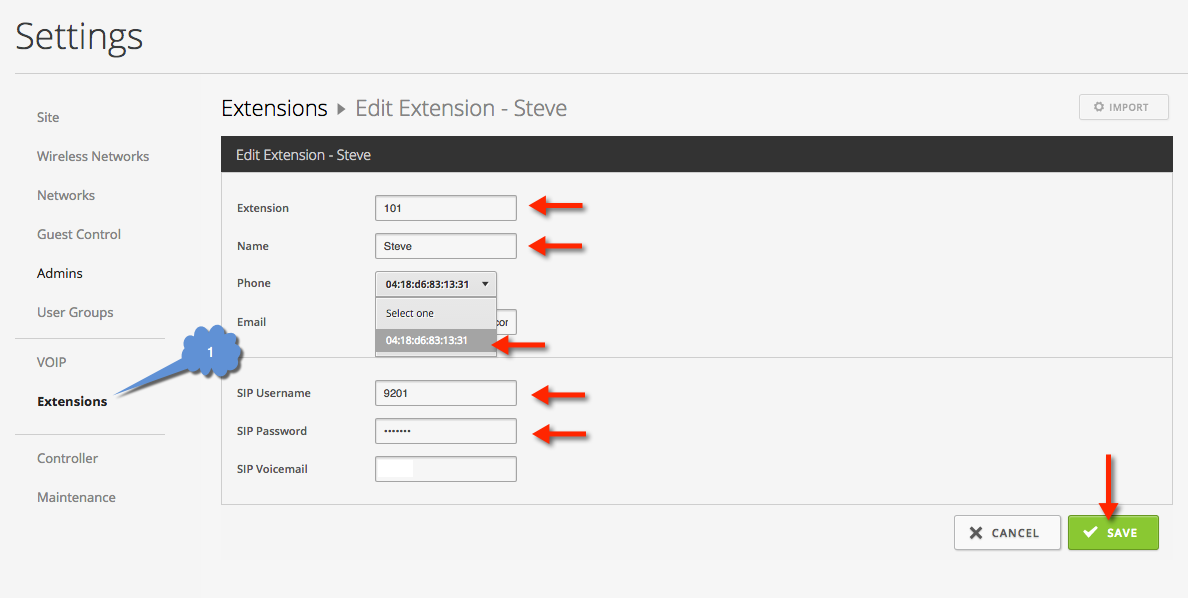
Continue this process for each phone, assigning each extension to a different UVP. The autoresponder extension is there by default and you are stuck with it and without the USG you don’t need it.
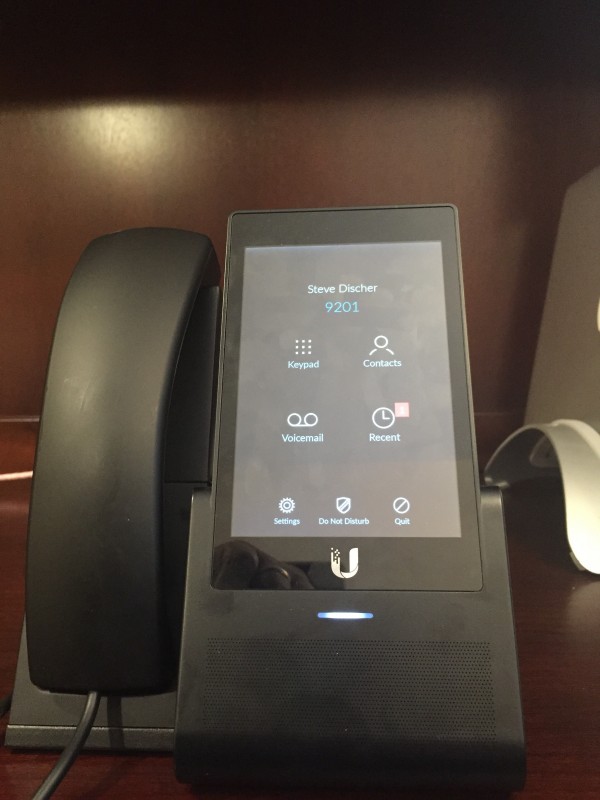
That’s it! Any changes made here will be pushed out to the phone almost immediately. I changed my name from Steve to Steve Discher and 5 seconds later my phone displayed the new name.
Good luck and enjoy your Ubiquiti UniFi UVP!
I look at this, and cry inside, as you are disabling the best sounding (if potentially a very bandwidth intensive, for many streams) non-internal-PBX codecs.
PCMU is the standard for all TDM telephony here in the ‘states, PCMA has a slightly different curve on its logarithmic amplitude within 8bits, and sounds ever so slightly better for all internal PBX calls than PCMU, slightly better clarity at low volume. It’s the TDM standard in almost the entire rest of the world vs US.
These 2 codecs IMHO should be enabled on FreePBX if not already, and your trunks to the general TDM network should also use whichever is appropriate for your country of origin.
G.722 is nice, if all your phones support it, or if you want your PBX to codec convert. I don’t use Asterisk/FreePBX, and instead use Freeswitch/FusionPBX. By default, I get PCMU/A and some Speex codecs as supported by the PBX.
So while I agree with removal of iLBC, Speex and GSM, I am very strongly in preference of keeping PCMU/A. They are highly standardized the world over, and you should make the effort to support them as a a potential codec in all systems you have connected to the PBX.
Thanks!
Mike
Good suggestion. After some more trial and error I got those two to work.