I was intrigued by the recently new feature being developed by MikroTik called “CAPsMan”. From the wiki “Controlled Access Point system Manager (CAPsMAN) allows centralization of wireless network management and if necessary, data processing. When using the CAPsMAN feature, the network will consist of a number of ‘Controlled Access Points’ (CAP) that provide wireless connectivity and a ‘system Manager’ (CAPsMAN) that manages the configuration of the APs, it also takes care of client authentication and optionally, data forwarding. When a CAP is controlled by CAPsMAN it only requires the minimum configuration required to allow it to establish connection with CAPsMAN. Functions that were conventionally executed by an AP (like access control, client authentication) are now executed by CAPsMAN. The CAP device now only has to provide the wireless link layer encryption/decryption.”
When I initially read that, I immediately thought of UniFi, Ubiquiti’s centrally managed enterprise wireless platform. From that point forward, I spent little time learning the facts and immediately began comparing the product to UniFi only to find I was disappointed with CAPsMAN and why wouldn’t I be? It had no web interface, no fancy graphs and seemed difficult to configure. I was wrong. I am not saying there is eye candy, because there isn’t but it’s beauty is in it’s innovation, and function over form. Best of all it can be built using existing, already deployed hardware, thereby using software to redefine your wireless network.
In summary, the CAPsMAN concept involves using your existing internet router (must be a MikroTik of course) and adding the optional CAPsMAN package. Then installing theCAPsMAN package on the AP devices. Conventional AP’s become CAPs and the router serves as the CAPsMAN controller and you are off to the races. Each CAP becomes simply an interface on the router. An interface you can bridge, address, route, whatever, treat it like any other interface. Want to know who is associated with a certain AP? Check the main CAPsMAN registration page. There is one page that summarizes all CAPs! Want to add a secondary or third ( I don’t like the word tertiary) , easy, just add it in CAPsMAN and it pushes the config to all the CAPs. Same thing with adding a new WPA key, click once, type, click ok and done, all CAPs get configured automatically.
Hopefully I have wet your appetite enough for you to dive in and try it so here is a step by step to get you going. Everything else is a modification of this basic setup.
CAPsMan HowTo
First, you must install thee CAPsMAN wireless package on the router and all AP’s. If using CAPs, this is already done for you. However, must CAPs come with CAPsMAN version 1 and you want version 2 so download it from MikroTIk.com, drag the file to your files window and reboot all devices.
CAPsMAN Router
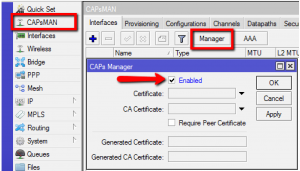
Once the router has the CAPsMAN package, open Winbox and enable the CAPsMAN manager service.
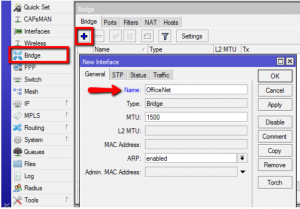
Next create a bridge interface for the CAPs to be added to dynamically when they appear on the network.
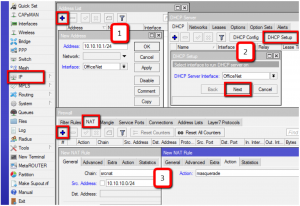
Add an IP address, DHCP Server and a NAT rule. You can learn how to do this elsewhere, like wiki.mikrotik.com for example.
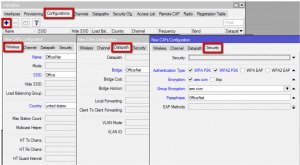
Add a new CAPsMAN configuration.
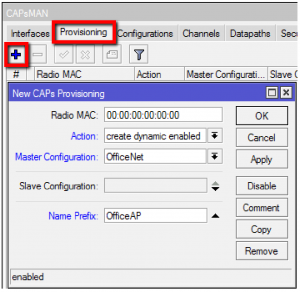
Add a new provisioning rule.
Configuring the CAP
This is a sticky wicket because there are a few options.
Option 1. Using a RouterBoard MAP or CAP
These are purpose built devices and I really like them for new installs. There is one design issue I have and that is they have a default config that is suited for a stand alone configuration. Basically it is a wireless AP with DHCP server on the wlan, DHCP client on the Ethernet, etc. I would rather it came factory configured to be a CAP. Clearly then did not consult me. To turn it into a CAP, there is a hardware option I will cover here.
Note that most CAPs and MAPs come with version 1 of the CAPsMAN software so BEFORE you use the hardware switch to set them to CAP mode, upgrade the CAPsMAN package!
CAP
There is a reset switch located on the underside of the device next to the Ether jack. Hold it down and apply power via the supplied POE adapter. Hold it steady for 10 seconds. The wireless LED will go from flashing to solid. Then release and it will load the CAP config and look for a controller on the local LAN. The is a Layer 3 discovery option for when the CAPsMAN is on a different Layer 3 segment or out on the internet somewhere but that is covered in the wiki as well.
Note: What I have described here is NOT covered correctly in the instruction sheet that comes with the CAP so throw that away and follow my instructions to save a lot of headache.
Within 2-3 minutes the CAP will be in CAP mode.
MAP
There is a reset switch located on the side of the device. Hold it down and apply power via the supplied POE adapter. Hold it steady for 10 seconds. The AP/CAP LED will go from solid to flashing, exactly the opposite of the CAP’s LED behavior. Standardize guys! Then release and it will load the CAP config and look for a controller on the local LAN.
Note Again: What I have described here is NOT covered correctly in the instruction sheet that comes with the MAP so throw that away and follow my instructions to save a lot of headache. Again.
Within 2-3 minutes the MAP will be in CAP mode.
In either case, forget the LEDs and hold the switch exactly 10 seconds and you are good to go.. When you release the switch the LEDs should do a quick blip, 2-3 of them will do it simultaneously telling you it is applying the config. You will learn to recognize that. Or not.
Option 2. Converting Non-CAPs or MAPs to CAPs
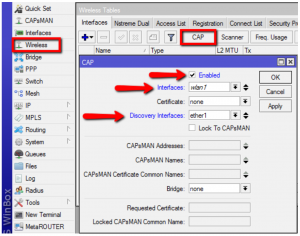
Simply download the version 2 CAPsMAN and drag it to the files window. Reboot and then configure the AP by first removing any existing configuration. Then configure it to be a CAP by using the following script which you can copy and paste to a terminal window:
/interface wireless
set [ find default-name=wlan1 ] l2mtu=1600 ssid=MikroTik
/interface wireless cap
set discovery-interfaces=ether1 interfaces=wlan1 enabled=yes
/ip dhcp-client
add default-route-distance=0 dhcp-options=hostname,clientid disabled=no interface=ether1
The device will then communicate with the CAPsMAN and become a CAP.
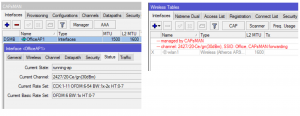
Once the CAP is configured, the CAPsMAN will show it’s status and the CAP will tell you it is being managed by the CAPsMAN;
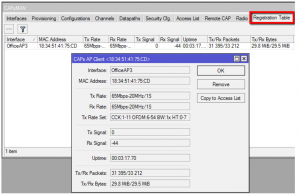
The registration table will then contain registrations for all CAPs:
There are a lot of modifications you can do at this point like add more SSIDs or optional security keys but this is the basic setup. Any more CAPs added to the local net will automatically be configured as CAPs as long as they are in CAP mode.
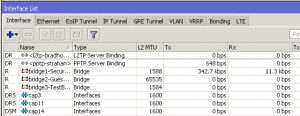
Here’s a screenshot from my router running CAPsMAN. As you can see the CAPs are just interfaces! Address them, run HotSpot on them, whatever you would normally do with a physical interface.
The more I learn, the more I like and I am sure if you give CAPsMAN a try you will like it too!
I used Uldis’ presentation from the MikroTIk USA MUM 2014 to create this how to and he included a lot more detail. You can ready his presentation HERE.
The manual for CAPsMAN is HERE.
Recent Comments